Week 7
Keyring
In today’s lesson, we have learnt how to use a CADD software, fusion 360. Before attending the tutorial lesson, each of us have to complete this keyring with our initials on it, respectively. We had troubles doing it at first because we do not know where to press to obtain the results we needed as the examples given, their functions were not exactly the same as the fusion360 that we were using. As such we had issues doing the assignment, but we manage to complete and figure out how to do it eventually. On the day of lesson itself, our teacher clarify our doubts and we are sure that we know how to use the software in a correct manner.
KIT
Constraints
After our teacher had gone through our keyring assignments, next we were given an activity about constraints. We were much more comfortable using the software once our teacher had gone through. We helped each other complete this activity and clarify doubts we had faced when we did this activity. Our finished product is as shown below:)
KIT
Photo Frame
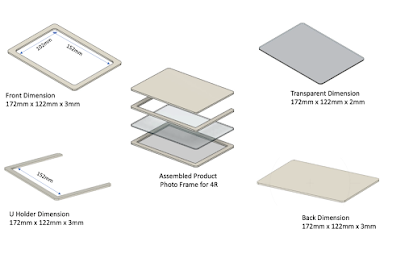
Lastly, we have to make our own photo frame using our own abilities without guidance from out teacher. The photo frame consists of the front, which is the frame, followed by the transparent plastic sheet, u-shape which is the holder and lastly the back cover. All of us did this on our own and compared the end results. We did not assign each part per person because we wanted to practice on our own. We discussed about the dimension as well as the sizes of each part. After clearing our doubts with our teacher, we finalize on the final dimension of the photo frame. We help each other along the way and below here is our end-product :D


The dimensions and 3D models of the photo frame components are appropriate. Great!
ReplyDelete